ArangoDB v3.13 is under development and not released yet. This documentation is not final and potentially incomplete.
Graph Analytics
ArangoGraph offers Graph Analytics Engines to run graph algorithms on your data separately from your ArangoDB deployments
ArangoDB Platform ArangoGraph
Graph analytics is a branch of data science that deals with analyzing information networks known as graphs, and extracting information from the data relationships. It ranges from basic measures that characterize graphs, over PageRank, to complex algorithms. Common use cases include fraud detection, recommender systems, and network flow analysis.
ArangoDB offers a feature for running algorithms on your graph data, called Graph Analytics Engines (GAEs). It is available on request for the ArangoGraph Insights Platform and included in the ArangoDB Platform.
Key features:
Separation of storage and compute: GAEs are a solution that lets you run graph analytics independent of your ArangoDB Core, including on dedicated machines optimized for compute tasks. This separation of OLAP and OLTP workloads avoids affecting the performance of the transaction-oriented database systems.
Fast data loading: You can easily and efficiently import graph data from ArangoDB and export results back to ArangoDB.
In-memory processing: All imported data is held and processed in the main memory of the compute machines for very fast execution of graph algorithms such as connected components, label propagation, and PageRank.
Workflow
The following lists outlines how you can use Graph Analytics Engines (GAEs). How to perform the steps is detailed in the subsequent sections.
- Determine the approximate size of the data that you will load into the GAE and ensure the machine to run the engine on has sufficient memory. The data as well as the temporarily needed space for computations and results needs to fit in memory.
- Start a
graphanalyticsservice via the GenAI service that manages various Platform components for graph intelligence and machine learning. It only takes a few seconds until the engine service can be used. The engine runs adjacent to the pods of the ArangoDB Core. - Load graph data from the ArangoDB Core into the engine. You can load named graphs or sets of node and edge collections. This loads the edge information and a configurable subset of the node attributes.
- Run graph algorithms on the data. You only need to load the data once per engine and can then run various algorithms with different settings.
- Write the computation results back to the ArangoDB Core.
- Stop the engine service once you are done.
Before you can use Graph Analytics Engines, you need to request the feature via Request help in the ArangoGraph dashboard for a deployment.
The deployment needs to use AWS as the cloud provider.
Single server deployments using ArangoDB version 3.11 are not supported.
- Determine the approximate size of the data that you will load into the GAE to select an engine size with sufficient memory. The data as well as the temporarily needed space for computations and results needs to fit in memory.
- Deploy an engine of the desired size and of type
gral. It only takes a few seconds until the engine can be used. The engine runs adjacent to a particular ArangoGraph deployment. - Load graph data from ArangoDB into the engine. You can load named graphs or sets of node and edge collections. This loads the edge information and a configurable subset of the node attributes.
- Run graph algorithms on the data. You only need to load the data once per engine and can then run various algorithms with different settings.
- Write the computation results back to ArangoDB.
- Delete the engine once you are done.
Authentication
You can use any of the available authentication methods the ArangoDB Platform
supports to start and stop graphanalytics services via the GenAI service as
well as to authenticate requests to the Engine API.
- HTTP Basic Authentication
- Access tokens
- JWT session tokens
The Management API for deploying and deleting engines requires an ArangoGraph API key. See Generating an API Key on how to create one.
You then need to generate an access token using the API key. See
Authenticating with Oasisctl
on how to do so using oasisctl login.
The Engine API uses one of two authentication methods, depending on the auto login to database UI setting in ArangoGraph:
- Enabled: You can use an ArangoGraph access token created with an API key (see above), allowing you to use one token for both the Management API and the Engine API.
- Disabled: You need use a JWT user token created from ArangoDB credentials. These session tokens need to be renewed every hour by default. See HTTP API Authentication for details.
Start and stop Graph Analytics Engines
The interface for managing the engines depends on the environment you use:
- ArangoDB Platform: GenAI service
- ArangoGraph: Management API
GenAI service
ArangoDB Platform
GAEs are deployed and deleted via the GenAI service in the ArangoDB Platform.
If you use cURL, you need to use the -k / --insecure option for requests
if the Platform deployment uses a self-signed certificate (default).
Start a graphanalytics service
POST <ENGINE_URL>/gen-ai/v1/graphanalytics
Start a GAE via the GenAI service with an empty request body:
# Example with a JWT session token
ADB_TOKEN=$(curl -sSk -d '{"username":"root", "password": ""}' -X POST https://127.0.0.1:8529/_open/auth | jq -r .jwt)

Service=$(curl -sSk -H "Authorization: bearer $ADB_TOKEN" -X POST https://127.0.0.1:8529/gen-ai/v1/graphanalytics)
ServiceID=$(echo "$Service" | jq -r ".serviceInfo.serviceId")
if [[ "$ServiceID" == "null" ]]; then
  echo "Error starting gral engine"
else
  echo "Engine started successfully"
fi
echo "$Service" | jq
List the services
POST <ENGINE_URL>/gen-ai/v1/list_services
You can list all running services managed by the GenAI service, including the
graphanalytics services:
curl -sSk -H "Authorization: bearer $ADB_TOKEN" -X POST https://127.0.0.1:8529/gen-ai/v1/list_services | jq
Stop a graphanalytics service
Delete the desired engine via the GenAI service using the service ID:
curl -sSk -H "Authorization: bearer $ADB_TOKEN" -X DELETE https://127.0.0.1:8529/gen-ai/v1/service/$ServiceID | jq
Management API
ArangoGraph
GAEs are deployed and deleted with the Management API for graph analytics on the ArangoGraph Insights Platform. You can also list the available engine sizes and get information about deployed engines.
To determine the base URL of the management API, use the ArangoGraph dashboard
and copy the APPLICATION ENDPOINT of the deployment that holds the graph data
you want to analyze. Replace the port with 8829 and append
/graph-analytics/api/graphanalytics/v1, e.g.
https://123456abcdef.arangodb.cloud:8829/graph-analytics/api/graphanalytics/v1.
Store the base URL in a variable called BASE_URL:
BASE_URL='https://...'
To authenticate requests, you need to use the following HTTP header:
Authorization: bearer <ARANGO_GRAPH_TOKEN>
You can create an ArangoGraph access token with oasisctl login. Save it in a
variable to ease scripting. Note that this should be the token string only and
not include quote marks. The following examples assume Bash as the shell and
that the curl and jq commands are available.
ARANGO_GRAPH_TOKEN="$(oasisctl login --key-id "<AG_KEY_ID>" --key-secret "<AG_KEY_SECRET>")"
Example with cURL that uses the token variable:
curl -H "Authorization: bearer $ARANGO_GRAPH_TOKEN" "$BASE_URL/api-version"
Request and response payloads are JSON-encoded in the management API.
Get the API version
GET <BASE_URL>/api-version
Retrieve the version information of the management API.
curl -H "Authorization: bearer $ARANGO_GRAPH_TOKEN" "$BASE_URL/api-version"
List engine sizes
GET <BASE_URL>/enginesizes
List the available engine sizes, which is a combination of the number of cores
and the size of the RAM, starting at 1 CPU and 4 GiB of memory (e4).
curl -H "Authorization: bearer $ARANGO_GRAPH_TOKEN" "$BASE_URL/enginesizes"
List engine types
GET <BASE_URL>/enginetypes
List the available engine types. The only type supported for GAE workloads is
called gral.
curl -H "Authorization: bearer $ARANGO_GRAPH_TOKEN" "$BASE_URL/enginetypes"
Deploy an engine
POST <BASE_URL>/engines
Set up a GAE adjacent to the ArangoGraph deployment, for example, using an
engine size of e4.
The engine ID is returned in the id attribute.
curl -H "Authorization: bearer $ARANGO_GRAPH_TOKEN" -X POST -d '{"type_id":"gral","size_id":"e4"}' "$BASE_URL/engines"
List all engines
GET <BASE_URL>/engines
List all deployed GAEs of a ArangoGraph deployment.
The engine IDs are in the id attributes.
curl -H "Authorization: bearer $ARANGO_GRAPH_TOKEN" "$BASE_URL/engines"
Get an engine
GET <BASE_URL>/engines/<ENGINE_ID>
List the detailed information about a specific GAE.
ENGINE_ID="zYxWvU9876"
curl -H "Authorization: bearer $ARANGO_GRAPH_TOKEN" "$BASE_URL/engines/$ENGINE_ID"
Delete an engine
DELETE <BASE_URL>/engines/<ENGINE_ID>
Delete a no longer needed GAE, freeing any data it holds in memory.
ENGINE_ID="zYxWvU9876"
curl -H "Authorization: bearer $ARANGO_GRAPH_TOKEN" -X DELETE "$BASE_URL/engines/$ENGINE_ID"
Engine API
Determine the engine URL
To determine the base URL of the engine API, use the base URL of the Platform
deployment and append /gral/<SERVICE_ID>, e.g.
https://127.0.0.1:8529/gral/arangodb-gral-tqcge.
The service ID is returned by the call to the GenAI service for
starting the graphanalytics service.
You can also list the service IDs like so:
kubectl -n arangodb get svc arangodb-gral -o jsonpath="{.spec.selector.release}"
Store the base URL in a variable called ENGINE_URL:
ENGINE_URL='https://...'
To authenticate requests, you need to use a bearer token in HTTP header:
Authorization: bearer <TOKEN>
You can save the token in a variable to ease scripting. Note that this should be
the token string only and not include quote marks. The following examples assume
Bash as the shell and that the curl and jq commands are available.
An example of authenticating a request using cURL and a session token:
PLATFORM_BASEURL="https://127.0.0.1:8529"

ADB_TOKEN=$(curl -X POST -d "{\"username\":\"<ADB_USER>\",\"password\":\"<ADB_PASS>\"}" "$PLATFORM_BASEURL/_open/auth" | jq -r '.jwt')

curl -H "Authorization: bearer $ADB_TOKEN" "$ENGINE_URL/v1/jobs"
To determine the base URL of the engine API, use the ArangoGraph dashboard
and copy the APPLICATION ENDPOINT of the deployment that holds the graph data
you want to analyze. Replace the port with 8829 and append
/graph-analytics/engines/<ENGINE_ID>, e.g.
https://<123456abcdef>.arangodb.cloud:8829/graph-analytics/engines/zYxWvU9876.
If you can’t remember the engine ID, you can List all engines.
Store the base URL in a variable called ENGINE_URL:
ENGINE_URL='https://...'
To authenticate requests, you need to use a bearer token in HTTP header:
Authorization: bearer <TOKEN>
- If Auto login to database UI is enabled for the ArangoGraph deployment, this can be the same access token as used for the management API.
- If it is disabled, use an ArangoDB session token (JWT user token) instead.
You can save the token in a variable to ease scripting. Note that this should be
the token string only and not include quote marks. The following examples assume
Bash as the shell and that the curl and jq commands are available.
An example of authenticating a request using cURL and a session token:
APPLICATION_ENDPOINT="https://123456abcdef.arangodb.cloud:8529"

ADB_TOKEN=$(curl -X POST -d "{\"username\":\"<ADB_USER>\",\"password\":\"<ADB_PASS>\"}" "$APPLICATION_ENDPOINT/_open/auth" | jq -r '.jwt')

curl -H "Authorization: bearer $ADB_TOKEN" "$ENGINE_URL/v1/jobs"
All requests to the engine API start jobs, each representing an operation. You can check the progress of operations and check if errors occurred. You can submit jobs concurrently and they also run concurrently.
You can find the API reference documentation with detailed descriptions of the request and response data structures at https://arangodb.github.io/graph-analytics .
Request and response payloads are JSON-encoded in the engine API.
Load data
POST <ENGINE_URL>/v1/loaddata
Import graph data from a database of the ArangoDB deployment. You can import named graphs as well as sets of node and edge collections (see Managed and unmanaged graphs).
curl -H "Authorization: bearer $ADB_TOKEN" -XPOST -d '{"database":"_system","graph_name":"connectedComponentsGraph"}' "$ENGINE_URL/v1/loaddata"
Run algorithms
PageRank
POST <ENGINE_URL>/v1/pagerank
PageRank is a well known algorithm to rank nodes in a graph: the more
important a node, the higher rank it gets. It goes back to L. Page and S. Brin’s
paper and
is used to rank pages in in search engines (hence the name). The algorithm runs
until the execution converges. To run for a fixed number of iterations, use the
maximum_supersteps parameter.
The rank of a node is a positive real number. The algorithm starts with every
node having the same rank (one divided by the number of nodes) and sends its
rank to its out-neighbors. The computation proceeds in iterations. In each iteration,
the new rank is computed according to the formula
( (1 - damping_factor) / total number of nodes) + (damping_factor * the sum of all incoming ranks).
The value sent to each of the out-neighbors is the new rank divided by the number
of those neighbors, thus every out-neighbor gets the same part of the new rank.
The algorithm stops when at least one of the two conditions is satisfied:
- The maximum number of iterations is reached. This is the same
maximum_superstepsparameter as for the other algorithms. - Every node changes its rank in the last iteration by less than a certain
threshold. The threshold is hardcoded to
0.0000001.
It is possible to specify an initial distribution for the node documents in
your graph. To define these seed ranks / centralities, you can specify a
seeding_attribute in the properties for this algorithm. If the specified field is
set on a document and the value is numeric, then it is used instead of
the default initial rank of 1 / numNodes.
Parameters:
graph_iddamping_factormaximum_superstepsseeding_attribute(optional, for seeded PageRank)
Result: the rank of each node
GRAPH_ID="234"
curl -H "Authorization: bearer $ADB_TOKEN" -XPOST -d "{\"graph_id\":$GRAPH_ID,\"damping_factor\":0.85,\"maximum_supersteps\":500,\"seeding_attribute\":\"seed_attr\"}" "$ENGINE_URL/v1/pagerank"
Weakly Connected Components (WCC)
POST <ENGINE_URL>/v1/wcc
The weakly connected component algorithm partitions a graph into maximal groups of nodes, so that within a group, all nodes are reachable from each node by following the edges, ignoring their direction.
In other words, each weakly connected component is a maximal subgraph such that there is a path between each pair of nodes where one can also follow edges against their direction in a directed graph.
Parameters:
graph_id
Result: a component ID for each node. All nodes from the same component obtain the same component ID, every two nodes from different components obtain different IDs.
GRAPH_ID="234"
curl -H "Authorization: bearer $ADB_TOKEN" -XPOST -d "{\"graph_id\":$GRAPH_ID}" "$ENGINE_URL/v1/wcc"
Strongly Connected Components (SCC)
POST <ENGINE_URL>/v1/scc
The strongly connected components algorithm partitions a graph into maximal groups of nodes, so that within a group, all nodes are reachable from each node by following the edges in their direction.
In other words, a strongly connected component is a maximal subgraph, where for every two nodes, there is a path from one of them to the other, forming a cycle. In contrast to a weakly connected component, one cannot follow edges against their direction.
Parameters:
graph_id
Result: a component ID for each node. All nodes from the same component obtain the same component ID, every two nodes from different components obtain different IDs.
GRAPH_ID="234"
curl -H "Authorization: bearer $ADB_TOKEN" -XPOST -d "{\"graph_id\":$GRAPH_ID}" "$ENGINE_URL/v1/scc"
Vertex Centrality
Centrality measures help identify the most important nodes in a graph. They can be used in a wide range of applications: to identify influencers in social networks, or middlemen in terrorist networks.
There are various definitions for centrality, the simplest one being the node degree. These definitions were not designed with scalability in mind. It is probably impossible to discover an efficient algorithm which computes them in a distributed way. Fortunately there are scalable substitutions available, which should be equally usable for most use cases.
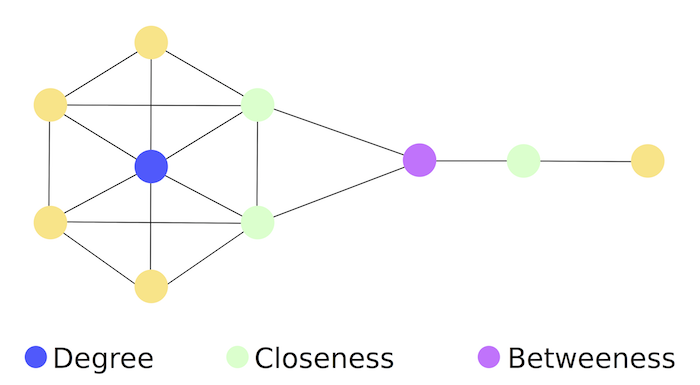
Betweenness Centrality
POST <ENGINE_URL>/v1/betweennesscentrality
A relatively expensive algorithm with complexity O(V*E) where V is the
number of nodes and E is the number of edges in the graph.
Betweenness-centrality can be approximated by cheaper algorithms like Line Rank but this algorithm strives to compute accurate centrality measures.
Parameters:
graph_idk(number of start nodes, 0 = all)undirectednormalizedparallelism
Result: a centrality measure for each node
GRAPH_ID="234"
curl -H "Authorization: bearer $ADB_TOKEN" -XPOST -d "{\"graph_id\":$GRAPH_ID,\"k\":0,\"undirected\":false,\"normalized\":true}" "$ENGINE_URL/v1/betweennesscentrality"
LineRank
POST <ENGINE_URL>/v1/linerank
Another common measure is the betweenness centrality : It measures the number of times a node is part of shortest paths between any pairs of nodes. For a node v betweenness is defined as:
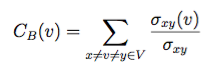
Where the σ represents the number of shortest paths between x and y, and σ(v) represents the number of paths also passing through a node v. By intuition a node with higher betweenness centrality has more information passing through it.
LineRank approximates the random walk betweenness of every node in a graph. This is the probability that someone, starting on an arbitrary node, visits this node when they randomly choose edges to visit.
The algorithm essentially builds a line graph out of your graph (switches the nodes and edges), and then computes a score similar to PageRank. This can be considered a scalable equivalent to vertex betweenness, which can be executed distributedly in ArangoDB. The algorithm is from the paper Centralities in Large Networks: Algorithms and Observations (U Kang et.al. 2011).
Parameters:
graph_iddamping_factormaximum_supersteps
Result: the line rank of each node
GRAPH_ID="234"
curl -H "Authorization: bearer $ADB_TOKEN" -XPOST -d "{\"graph_id\":$GRAPH_ID,\"damping_factor\":0.0000001,\"maximum_supersteps\":500}" "$ENGINE_URL/v1/linerank"
Community Detection
Graphs based on real world networks often have a community structure. This means it is possible to find groups of nodes such that each node group is internally more densely connected than outside the group. This has many applications when you want to analyze your networks, for example Social networks include community groups (the origin of the term, in fact) based on common location, interests, occupation, etc.
Label Propagation
POST <ENGINE_URL>/v1/labelpropagation
Label Propagation can be used to implement community detection on large graphs.
The algorithm assigns an initial community identifier to every node in the graph using a user-defined attribute. The idea is that each node should be in the community that most of its neighbors are in at the end of the computation.
In each iteration of the computation, a node sends its current community ID to all its neighbor nodes, inbound and outbound (ignoring edge directions). After that, each node adopts the community ID it received most frequently in the last step.
It can happen that a node receives multiple most frequent community IDs. In this case, one is chosen either randomly or using a deterministic choice depending on a setting for the algorithm. The rules for a deterministic tiebreak are as follows:
- If a node obtains only one community ID and the ID of the node from the previous step, its old ID, is less than the obtained ID, the old ID is kept.
- If a node obtains more than one ID, its new ID is the lowest ID among the most frequently obtained IDs. For example, if the initial IDs are numbers and the obtained IDs are 1, 2, 2, 3, 3, then 2 is the new ID.
- If, however, no ID arrives more than once, the new ID is the minimum of the lowest obtained IDs and the old ID. For example, if the old ID is 5 and the obtained IDs are 3, 4, 6, then the new ID is 3. If the old ID is 2, it is kept.
The algorithm runs until it converges or reaches the maximum iteration bound. It may not converge on large graphs if the synchronous variant is used.
- Synchronous: The new community ID of a node is based on the community IDs of its neighbors from the previous iteration. With (nearly) bipartite subgraphs, this may lead to the community IDs changing back and forth in each iteration within the two halves of the subgraph.
- Asynchronous: A node determines the new community ID using the most up-to-date community IDs of its neighbors, whether those updates occurred in the current iteration or the previous one. The order in which nodes are updated in each iteration is chosen randomly. This leads to more stable community IDs.
Parameters:
graph_idstart_label_attributesynchronousrandom_tiebreakmaximum_supersteps
Result: a community ID for each node
GRAPH_ID="234"
curl -H "Authorization: bearer $ADB_TOKEN" -XPOST -d "{\"graph_id\":$GRAPH_ID,\"start_label_attribute\":\"start_attr\",\"synchronous\":false,\"random_tiebreak\":false,\"maximum_supersteps\":500}" "$ENGINE_URL/v1/labelpropagation"
Attribute Propagation
POST <ENGINE_URL>/v1/attributepropagation
The attribute propagation algorithm can be used to implement community detection. It works similar to the label propagation algorithm, but every node additionally accumulates a memory of observed labels instead of forgetting all but one label.
The algorithm assigns an initial value to every node in the graph using a user-defined attribute. The attribute value can be a list of strings to initialize the set of labels with multiple labels.
In each iteration of the computation, the following steps are executed:
- Each node propagates its set of labels along the edges to all direct neighbor nodes. Whether inbound or outbound edges are followed depends on an algorithm setting.
- Each node adds the labels it receives to its own set of labels.
After a specified maximal number of iterations or if no label set changes any more, the algorithm stops.
Parameters:
graph_idstart_label_attribute: The attribute to initialize labels with. Use"@id"to use the document IDs of the nodes.synchronous: Whether synchronous or asynchronous label propagation is used.backwards: Whether labels are propagated in edge direction (false) or the opposite direction (true).maximum_supersteps: Maximum number of iterations.
Result: The set of accumulated labels of each node.
GRAPH_ID="234"
curl -H "Authorization: bearer $ADB_TOKEN" -XPOST -d "{\"graph_id\":$GRAPH_ID,\"start_label_attribute\":\"start_attr\",\"synchronous\":false,\"backwards\":false,\"maximum_supersteps\":500}" "$ENGINE_URL/v1/attributepropagation"
Store job results
POST <ENGINE_URL>/v1/storeresults
You need to specify to which ArangoDB database and target_collection to save
the results to. They need to exist already.
You also need to specify a list of job_ids with one or more jobs that have run
graph algorithms.
Each algorithm outputs one value for each node, and you can define the target
attribute to store the information in with attribute_names. It has to be a
list with one attribute name for every job in the job_ids list.
You can optionally set the degree of parallelism and the batch_size for
saving the data.
Parameters:
databasetarget_collectionjob_idsattribute_namesparallelismbatch_size
JOB_ID="123"
curl -H "Authorization: bearer $ADB_TOKEN" -X POST -d "{\"database\":\"_system\",\"target_collection\":\"coll\",\"job_ids\":[$JOB_ID],\"attribute_names\":[\"attr\"]}" "$ENGINE_URL/v1/storeresults"
List all jobs
GET <ENGINE_URL>/v1/jobs
List all active and finished jobs.
curl -H "Authorization: bearer $ADB_TOKEN" "$ENGINE_URL/v1/jobs"
Get a job
GET <ENGINE_URL>/v1/jobs/<JOB_ID>
Get detailed information about a specific job.
JOB_ID="123"
curl -H "Authorization: bearer $ADB_TOKEN" "$ENGINE_URL/v1/jobs/$JOB_ID"
Delete a job
DELETE <ENGINE_URL>/v1/jobs/<JOB_ID>
Delete a specific job.
JOB_ID="123"
curl -H "Authorization: bearer $ADB_TOKEN" -X DELETE "$ENGINE_URL/v1/jobs/$JOB_ID"
List all graphs
GET <ENGINE_URL>/v1/graphs
List all loaded sets of graph data that reside in the memory of the engine node.
curl -H "Authorization: bearer $ADB_TOKEN" "$ENGINE_URL/v1/graphs"
Get a graph
GET <ENGINE_URL>/v1/graphs/<GRAPH_ID>
Get detailed information about a specific set of graph data.
GRAPH_ID="234"
curl -H "Authorization: bearer $ADB_TOKEN" "$ENGINE_URL/v1/graphs/$GRAPH_ID"
Delete a graph
DELETE <ENGINE_URL>/v1/graphs/<GRAPH_ID>
Delete a specific set of graph data, removing it from the memory of the engine node.
GRAPH_ID="234"
curl -H "Authorization: bearer $ADB_TOKEN" -X DELETE "$ENGINE_URL/v1/graphs/$GRAPH_ID"